31 January 2010

Update to HP Mini 311 Hackintosh

The brilliant guys (theproto et. al) from the HP Mini 311 Darwin Project at insanelymac have posted a new release named "HF4". You could burn the .ISO to a blank CD, or alternatively, for a more environmentally friendly solution, put it in USB stick.

What you need: (1) BootMyISO, (2) USB flashdrive - any size would do since the .ISO is only around 5 MB in size, and (3) HP Mini 311 Darwin Project current HF4 release
* This is done on a Windows PC

What to do:
1) Plugin your USB stick and run BootMyISO. Just follow the on screen instructions.

2) Access your USB flashdrive and put the HF4 .ISO in it. "HPM311DP_1109CHF4.iso".

3) Look for the "menu.lst" file and edit. Take out all the "#" comment before the lines in the "Test ISO" section. Then replace the name of the .ISO referred to in the file with "HPM311DP_1109CHF4.iso" and save the file. You can rename "Test ISO" to the name you prefer.

(I suggest using Notepad++ for a more intuitive, easier on the eyes editing).

You should now have a bootable USB stick with the release ISO to boot your retail Snow Leopard Install DVD with for your HP Mini 311 and continue with the installation as per usual procedure in the how-to guide.

EDIT: BootMyISO is now MultiBootISO. It's basically the same principle. Here's MultiBootISO's menu.lst file:
There are additional find and map parameters (--set-root, --mem) but it's essentially the same.

27 January 2010

AirLife 100


HP's smartbook which runs on Android over SnapDragon technology is a promising machine. Personally I'm liking the build - I'm guessing it's about the same form factor as the HP Mini 1000 (not the Mini 110) as you can see from the hinge design and edge to edge glass LCD panel, also the profile seems as thin as that of the Mini 1000.
An interesting addition is the touch screen that's installed. And since the machine is based on Android, an OS that's essentially browser-centric, the old trackpad with buttons flanking its right and left sides instead of sitting below the trackpad surface like on most notebooks and netbooks, is redesigned with internet browsing in mind. The right button is divided into two: top part becomes a "Home" button and the bottom part resembles an "Back" key for going back to a webpage previously visited. The left button is now divided as well for left and right click. Good thing perhaps as you no longer have to traverse the trackpad surface to get to the other button for right click like before.

25 January 2010

Visiting Hackintosh Shrines


image is actually for NetbookInstaller
And I meant "cyber shrines". Those links at the left sidebar, "Stuff to read" list, aren't merely there just to make this blog enticing according to a rule (I forgot which number it was) for blogging: "Readers love links. Link to other blogs and sites you find interesting." Not the exact words but works to an effect like that.
While that may probably be true - I, as a reader love links a lot - I look at my "Stuff to read" list as resources for the beginning hackintosher like me.

Remember this post about dual-booting Snow Leopard and Windows XP via Boot Camp Assistant on GPT (GUID Partition Table) formatted hard drive? I did that on my HP Mini 1000 and then forgot it almost completely so when I next tried to do it again, I was literally and utterly at lost when the Windows XP install process couldn't move beyond copying install files onto the designated partition.

Being the noob that I am, I resigned it all to the randomness of the whole hackintoshing exercise. But as it turns out, I was the random one - random whims of trying this and that and not documenting stuff to stay on top of the overwhelming surge of resources or lack thereof. The truth is, there's no such thing as "randomness" in the straightforward science of computing; it's clear and precise definition of 0's and 1's and it was only my addled brains that lacked the faculties to process what's laid before me to absorb.

It was no random thing that I'd been able to dual boot Snow Leo and Win XP on a GPT formatted hard drive. It was something called "gptsync".

What gptsync basically does is create a hybrid partition table from a GPT partition; that is MBR + GPT. I've forgotten that I used a USB installer which I'd made by restoring Snow Leopard Retail DVD on it and then making it bootable via NetbookBootMaker. Using this medium, I proceeded with the steps of installing Snow Leo on my then functioning HP Mini 1001TU and one of the steps in that process was to setup my partitions.

In short, I formatted my drive with gptsync feature from NetbookBootMaker. I was using gptsync all along and I never knew until now when I visited this "hackintosh shrine".

24 January 2010

Vista Issues And Snow Leopard On Top Of Leopard


Perhaps I'm just all too ready to put the blame on Vista. I recently installed Vista on our family PC so my mom could familiarize herself with the OS - it's what they're using now at the office. She would complain about "not being able to find her stuff". I'm complaining about not being able to post on insanelymac. Everytime I attempt to login, it appears to have worked but when I try adding a reply to a thread, it prompts me to login again. Bugger.

Anyhow, since I'll be needing my HP Mini 311 in school this week, I've reverted to my old setup: Broadcom 4312 HMG (card from the HP Mini 1000) in the half-height pci slot and the Broadcom 4312 HMGB combo WiFi + BT that the 311 comes stock with, has been moved to the full height slot (and secured by a tape).

I'm gonna restore a Mac OS X 10.5.6 installation onto a second partition on my 311's drive and then install Mac OS X 10.6 on top to continue the experiment.

I'm wondering if the current setup for my pci slots will have impacts on the results so I'm deliberating whether to roll back or not the 311 to its "stock" state (only 1 wifi card and that's the stock combo card installed in the original half height pci slot).

Either way, one thing's for sure: the stock combo wifi card does show up as "Wireless Third Party" complete with MAC address but cannot be turned on. There was one time when Bluetooth worked - I booted in verbose once and since then the peripheral would always be recognized and working.

Geez, I should've gotten a kextstat running for documentation the first time I went "Snow Leo on top of Leo".

Update: I'm not getting the results I wanted - the ones I got last time - from a double installation. For a refresher, "last time" I wiped out my whole hard drive to install retail vanilla Leopard 10.5.6 and then installed Snow Leopard on top of that as upgrade with the stock combo WiFi+BT card back in its original half-height pci slot on the Mini 311. I had issues with booting up then.
Now I've to have a functional laptop (ok, "netbook" it is) this week for school and a bit of work so I reinstalled Snow Leopard on my 311 via normal HP Mini 311 Darwin Project along with EFI cofiguration. I'm using HF3 with no issues and I'm happy.
Guess what - the "Snow Leo on top of Leo" on the second partition in my hard drive kernel panics. It's not liking something about the stuff Chameleon loads for it from my EFI partition and complains about AppleIntelCPUPowerManagement not suiting its tastes. I'll get back to this next weekend when I don't have to use my Mini MacBook Air for normal non-geeky activities.

23 January 2010

BTCoexistence feature not supported!


BRCM94312HMGB.
That "B" in there, which I believe is for "bluetooth", makes life as noob hackintosher really hard for me.
So I've installed Snow Leopard on top Leopard on my HP Mini 311. But I haven't been able to boot into the desktop yet.

Using the HP Mini 311 Darwin Project CD to boot my installation on my 311's hard drive (it boots in verbose mode) I could see that the card mentioned above was recognized - something that hadn't happened in fresh Snow Leopard installation. It gives me the MAC address as well for the card, but I can't get to the desktop as I've mentioned already.

The same happens in Leopard - the only difference is that I was able to get into the desktop and see that the system recognizes the WiFi card alright but it's turned off. Bluetooth is not in Leopard is non existent - so much for integrated sutff.

I'm thinking it's gonna be the same exact story in Snow Leopard if and when I get to the desktop.

I'll have to look into this from insanelymac.

22 January 2010

Of Chaos, WiFi Cards, Hard Drives, and Keyboards


(Chaos)

Today is a day full of surprises when snippets of info here and there with the postman not returning my Php 5.00 change can be life altering. Alright, it's obvious I'm waxing poetic here so to cut the chase short, let's just say today has a general air of happiness all around.
My MSI Wind U100's keyboard  - yes, the keyboard made from no-more-thicker-than-a-disposable-plastic-cup-material - died on me after 18 months of use and abuse. Not that the machine is now beyond recognition as what it was when new but I haven't been giving it the exact same amount of tender loving care that I do (or did) its other siblings - the newest HP Mini 311 and the HP Mini 1001TU (bless its silicon innards and may it rest in peace while I put its WiFi card in better use on the 311).
Back to the keyboard of the MSI Wind. I used to think that stuff are delivered faster when they're sent to Metro Manila addresses and so I always had my ebay orders from Hong Kong to be sent in Makati. I remember I received my HP Mini 1000's replacement keyboard around 1 month after I ordered it online. I ordered an EeePC 701 keyboard for my cousin as well but I got the item after 1 and 3 weeks. Now I'm getting evicted from where I'm staying in Makati so I had the MSI Wind's replacement keyboard sent to Bulacan. My mind was set to embrace the possibility of seeing the keyboard in summer or after 3 months in April this year.
But this afternoon, my assumptions were overruled and I got the white keyboard 17 days after placing an order in ebay. And what's even better is that I didn't have to pick it up from the post office branch in our municipality like I had to in Makati cause a guy riding a motorbike drove by this afternoon at our house and handed me a box packaged in a familiar way a la My NoteBook World (ebay seller where I get my stuff from; a very trustworthy seller) way laced of the delivery guy's reeking cologne. When he said he didn't have change for my two Php 20 bills (the customs' fee is Php 35), I was more than happy to let him keep the Php 5.
My MSI Wind has Snow Leopard installed now, EFI as well but recently, I had to install Vista to watch a fave drama as it aired live in Taiwan via PPLive. (It's really a pitty that there's no PPLive equivalent in Mac OS X, at least none that I know of). Vista screwed up Chameleon but this is something that's expected and so I really wasn't surprised or upset. I realized I wanted to go back to dual-booting OS X and Windows XP and so I've partitioned the Wind's 160 GB HDD into 2 using MBR table. And now I'm restoring an all Vanilla Snow Leopard installation on the HFS formatted partition. I'll see later if I'm successful in putting Snow on MBR then I'll get XP on the other, topping it off with an application of NetbookBootMaker to boot it all up. It's a lazy man's strategy - all have Snow Leo inside the Wind already the way I want it will all my apps and configs done.
My HP Mini 311 suddenly couldn't turn on the Mini 1000's WiFi card. I tried booting off a live usb Ubuntu 9 stick as well as Mac OS X Leopard installation off an external hard drive to turn on the card but no avail. I then proceeded with restoring the stock card and then installing Windows XP - even with the necessary drivers for the integrated WiFi Bluetooth module, the HP Wireless Assistant told me the card was disabled - it cannot turn it on. Bluetooth though was turned on fine. I ended up restoring the 311's stock Windows 7 installation and WiFi card was functional again. Oh geez, HP and its soft switches are driving me nuts!
So I'am for the moment I'm without an OS X machine. I'm writing this post off Leopard on a 20 GB usb external drive plugged into the Wind. Chaos.
My old NVflash.exe strategy is completely turned over as the app refuses to acknowledge the Ion being a true blue nVidia card. That said, I don't have a ROM to create an NVCAP string with to put into the boot plist to enable Quartz Extreme on Leopard on the Mini 311. I'm gonna go another route.
A fellow forumer at myhpmini.com reports that he got his Mini 110's wifi working in Snow Leopard even though that's perceived as practically impossible by MacBook Mini owners around the globe. He said he's originally got a Leopard installation running on his 110 and he's got WiFi as is normally expected for the 110 in Leo. But what he did is did an upgrade to Snow Leo and installed this Mac OS X version on top of his existing Leopard installation and BAM! WiFi works, he says.
Now it may well be that his 110 has a different card from the other 110 - a card that's 10.6 compatible but I think I'm gonna try it on my 311 just the same to check things out. Who knows? Maybe this is the pleasant surprise we've all been waiting for. Maybe we only need to install Leopard just "in passing" to take care of the "enabling" the WiFi card but still with the ultimate goal of Snow Leopard.

21 January 2010

If This Baby Will Run OSx86, I Want It!

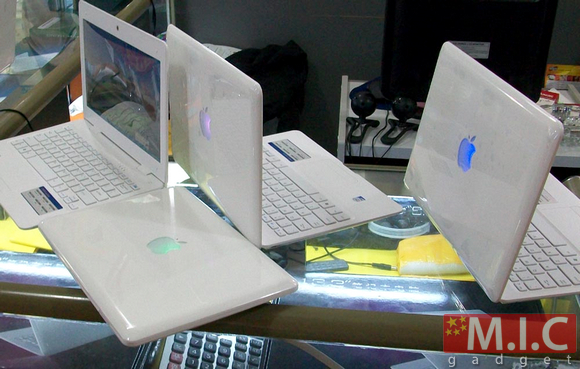
This is one of those moments - right there in the spot along skinny Chinese models with pearly white skin (and teeth) - that I wish I were born Chinese instead. That way, besides the possibility of being one of the runway's prized beauties or starring in my own asian drama, I could easily get myself one of these MacBook Air knockoffs for 1,700 RMB (around $250) - not bad. But I'm no Chinese and I can't get this netbook unless I specifically go to China on vacation.

They added an extra tiny leaf for the half bitten apple; and that makes it their original? Kinky!


Even packaging perhaps aspires to be Mac-like:


But it runs Windows XP and not Mac OS X

If I were Chinese, would I be smart and then make significant contributions to the OSx86 community?

20 January 2010

Leopard on the HP Mini 311 : Fight Plan No.1


image from geek.pe
Like I've said before, I'm gonna go kext route as initial strategy on enabling Leopard features on the HP Mini 311 and first on the feature is Quartz Extreme.
I found this in the Project OS X forums:

Add your device ID in /system/library/extensions/NVDAResman.kext/contents/info.plist

Add your device ID in /system/library/extensions/NVDANV50Hal.kext/contents/info.plist
Find/download an injecter (any one will do, they're basically the same thing, only plists differ)
Add your device ID in (some_injecter.kext)/contents/info.plist
In the same plist, set the NVCAP string correctly and replace the IOProbeScore number by 0.
My main problem is getting the NVCAP string which I do by using NVCap app to generate a string through the ROM file for Ion which I extract by running NVflash.exe from inside Windows which I don't have installed on my Mini 311 which doesn't accept BartPE since BartPE does not support SCSI (at least my BartPE does not).

Unless I find a readily available NVCAP string for the Ion (which is essentially an nVidia 9400M) on the internet, or find an easy, far from time consuming, way to include SCSI support on my BartPE stick, it's a long shot of installing Windows on my Mini 311.


Then again, I'm not sure whether this would work or not.

14 January 2010

Quartz Extreme at the End of the Tunnel?


I wish I didn't have MA class this Saturday so I could begin playing with NVinject, EFI strings, NVCAP etc. - all for the sake of enabling Quartz Extreme in Mac OS X 10.5 Leopard.

So far, on 10.5.6, there are 2 major points I'd like to sort out:
(1) Full graphics hardware accelaration or simply put, enable Quartz Extreme - NVinject method is first for me try
(2) Audio - sound assertions in the dsdt.aml from the HP Mini 311 Darwin Project (which supports Mac OS X 10.6 Snow Leopard exclusively) causes freezes during boot up.

That's 2 out of a legion of "issues" I'm anticipating.

For now, as initial approach in this so-called "reconnaissance stage" with Mac OS X 10.5 Leopard on the HP Mini 311, I'm using kexts with some EFI strings approach and not dsdt.aml yet (which I hope to arrive at as finishing stages).

Gee, it's like writing my thesis again only this time, it's aiming at less abstract ends than my literature concentrated thesis in college :D

10 January 2010

Proof Of Concept : Leopard on the HP Mini 311

As un-wallet-friendly and unacceptable it is, the fact of the matter remains that the Broadcom WiFi cards that the current HP Mini 311 ships with as stock configuration do NOT work in Snow Leopard. To be precise and to put it in black and white once and for all to potential question of "Does WiFi work under Mac OS X 10.6 Snow Leopard on the HP Mini 311-xxxxxx?"; Snow Leopard can only go as far as sensing the presence of those specific cards but remains, upto this day, UNABLE to "switch them On" for exploitation. So even if the it's a Broadcom "4312" and technically falls under the BCM_43xx family of wireless modules, a family that's supposedly supported via the plugin present in the IO80211Family.kext; a simple info.plist editing for that plugin suffices NOT.

But there have been reports that the stock WiFi works under Leopard. And so I have to see first hand to know and that's why I did an experiment over the weekend.

As far as I'm concerned, and after dabbling with Leopard on the HP Mini 311 for alternatives these are my choices at the end of the day, err, the weekend:

(1) Snow Leopard on the HP Mini 311 = reflash your unit's bios withe de-whitelisted one courtesy of icelord and get a Snow Leopard compatible WiFi module.
(2) Stock WiFi card/module on the HP Mini 311 = OS X Leopard 10.5 via Netbook BootMaker.

AirPort 1 is actually my HP Mini 1000's WiFi card


And for the first time (I didn't bother checking it out in Win 7), I got to say "hi" to my Mini 311's stock WiFi card's MAC address.

However, this post does NOT claim that option (2) is already a viable alternative to option (1) as two important features, among minute other details, are still to be figured out - Quartz Extreme/Graphics acceleration and audio. Without QE, it's just painful to work in Mac OS X, in my opinion.

So if you want a working machine for a third of what the MacBook Air costs, the HP Mini 311 even with the inevitable costs for replacing the WiFi module still fits that bill nicely with Snow Leopard installed. (And if you don't mind the measly 2 hour battery life, of course). Plus you get an active community at insanelymac to go to for resource (for questions or support, go to this thread, to avoid getting scolded ;)).

In my case, there's little stigma for me to be enthusiastic in slaving away trying to get Quartz Extreme and audio enabled under Leopard since I've already got my WiFi card replacement from my dead Mini 1000 - I've got a working setup in my hands already.

But it's something I'm still toying the idea of. Going for option (2) will have to be put to the back burner, is all I'm saying.
And if anyone's interested, here's what you do to get a semi-functional Leopard on your HP Mini 311 with working stock WiFi card as the only reward:

What you need: Download NetbookBootMaker and MacOSX10.5.6 Combo Update (if your retail DVD installer isn't already 10.5.6 - we're using 10.5.6 just to be sure NetbookBootMaker works), Leopard Retail DVD, a working Mac/hackintosh, a spare USB drive 8gb plus.
What to do:
(1) Plug in your spare drive (on your functional Mac/hackintosh) and launch Disk Utility to format it as MBR or GUID.
(2) With the Leopard Retail DVD mounted (this'll be faster if you have an .dmg image of the DVD installer on the Mac/hackintosh you're gonna do this procedure on), navigate Cmd+Shift+G to /Volumes/Mac OS X Install DVD/System/Installation/Packages.
(2) Look for the file "OSInstall.mpkg" and launch it, pointing the installation to the spare USB drive you've just formatted in Step (1).


^Obviously my Apacer usb flashdrive which is only 4gb can't work; you'd need at least 6.5 gb for Leopard. Anyway, let's just pretend it's all fine.
(3) Once the installation is completed - it's a loooooong process by the way, yours may vary depending on your machine and drive - launch the 10.5.6ComboUpdate package and point the installation to the spare external drive you installed Leopard on.
(4) Again, after the running the update - another long process in my experience - launch NetbookBootMaker, choosing your spare drive as destination.
 
(5) Now get your HP Mini 311, plug in the drive you just did all this stuff to, press F9 to choose your drive. Chameleon will load; press any key to interrupt loading and type this:

CODE:
"GraphicsMode"="1366x768x32" -v

Then press Enter.

If all goes well (that is, within the limits of expectations from this exercise), you'll have a a working Leopard on the HP Mini 311 with WiFi without replacing the stock card BUT WITHOUT:
(a) Quartz Extreme
(b) Audio

If you want to experiment further, see the old post at the insanelymac thread for the HP Mini 311 Darwin Project for experimenting with *NVEnabler.kext to get Quartz Extreme working.
Remember the shoe? UpdateExtra found in /Extra of your drive (where you installed Leopard and applied NetbookBootMaker on) is again your dear friend.
*I had tried this once but it didn't work the first time and I'm still lazy to try again. Sorry.

08 January 2010

The Battle Continues


I feel forever grateful to those great hackintosher legends in the OSx86 arena who just won't give up for the love of freedom and out-of-the-box thinking.

It's no recent news that Apple's about to unleash yet another update to Snow Leopard dubbed 10.6.3 which started to creep in Apple-centric sites in the websphere since December last year. This is the next point release after 10.6.2 which, like its predecessor, is expected to include a new kernel (10.6.1 preserved stock 10.6's kernel) and so, like its predecessor, we're expecting 10.6.3 to be hostile to the Atom processors our precious little MacBook Mini's run on as well.

Good thing the community is prepared and initial efforts have been put forward for OSx86 users even before 10.6.3 has been officially released as downloadable point upgrade at Apple's site.
Read more details at meklort's blog.

MSI Envy

HP Envy you say?
No, actually this is me having another gadget lust.
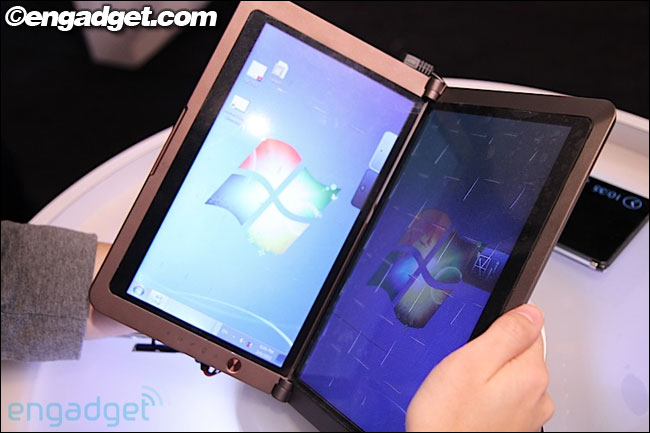
Lots of new and enticing stuff from old strong players in 2009 in this year's 2010 CES. One notable exhibit is the MSI's dual touch screen.

Virtual keyboard on the 2nd touch screen.

And makes for a fascinating e-book reader.

If MSI lives up to its reputation of spitting out hackintosh / OSx86 compatible hardware, this'll be a hackintosher's dream come true. Let's just hope it's build quality is nothing like the U100's :D
If you're francophone, read the article at blogeee.net.

06 January 2010

Resume from Sleep Without Verbose Mode

How my EFI /Extra folder looks after the successful experiment

If you installed using the HP Mini 311 Darwin Project installers, you'd notice that your default boot mode is verbose mode; i.e. white text flashing on your screen on a black background. Wherefore hath thou included a Themes folder in thy EFI/Extra/ partition if you weren't gonna be seeing it the entire boot time (which in my case is a nice 00:00:36.7 seconds)?

The reason for that, as documented at the thread, is that the 311 cannot resume properly from sleep if it doesn't boot in verbose. Looks like dynamics of power management and sleep problems we've got here.

Actually the 311 like most hackintoshes, I believe, is not able to use the vanilla AppleIntelCPUPowerManagement.kext. It kernel panics so we have to tell OS X not to use that kext via using Disabler.kext or NullCPUPowerManagement.kext (just choose between the two). However, it is that same kext (AppleIntelCPUPowerManagement.kext) that takes care of sleep/resume and all power related stuff in real Macs. And since hackintoshes are allergic to it, they utilize a different method in lieu of AICPUPM - in the 311 we have VoodooPowerMini +SleepEnabler + dsdt.

More specifically, via the HP Mini 311 Darwin Project, VoodooPowerMini is placed in /System/Library/Extensions, on grounds that the kext is unable to load when placed in EFI/Extra/Extensions where the rest of the kexts are hence it's labeled as "tainted". Another kext, the ApplePS2Controller used to drive the (nasty) Alps GlidePoint trackpad, is reported to behave similarly; it's also "tainted".

Now I, amazed by the ease of EFI configuration brought about by the project installer, wanted to see the marvelous handiwork and decided to take a peep inside the EFI partition. This is what I found:
No kextcache (Extensions.mkext) in /Extra. This I found weird since I've always had Extensions.mkext /Extra. So I decided to do a little experiment.

Question: Would having VoodooPowerMini and ApplePS2Controller included in the kextcache inside EFI make a difference in how these two kexts are loaded by Chameleon during boot up?

(1) I moved ApplePS2Controller and VoodooPowerMini from /System/Library/Extensions
(2) Repaired systems permissions using Onyx. (This could also be done via Disk Utility which is in Applications > Utilities, it's just that my personal fave is Onyx).
(3) Put ApplePS2Controller.kext and VoodooPowerMini.kext in EFI/Extra/Extensions and did a kextcache for the system. I did this using UpdateEFI made by Dalton from the insanelywind forums. (If you don't have an account in insanelywind, you can use this link to get UpdateEFI but I strongly recommend subscribing to that forum). This app integrates in a user-friendly GUI the famous script for updating EFI kexts and which also creates Extensions.mkext cache from the old Vanilla EFI method started by a hackintosher named munkey (I believe).
(4) Took out the "-v" entry in the string for Kernel Flag key in my boot.plist inside EFI/Extra and restarted.

Result: Yes, it does. Having an Extensions.mkext that cached VoodooPowerMini and ApplePS2Controller means they are loaded even when they reside in Extra/Extensions inside EFI. My HP Mini 311 resumes fine from sleep without verbose mode.

Notes on using UpdateEFI:
- When you launch the app, you have two (2) options: (1) Basic Changes and (2) OS Update.
- Basic Changes makes EFI partition readily accessible so you can edit its contents (drag & drop, delete) and also rebuilds an Extensions.mkext which it puts in EFI /Extra/ folder.
- OS Update will do the same BUT it'll patch video graphics card kexts in the /Extra/Extensions folder. (It will look for 27aeAppleIntelGMA950 and 27aeAppleIntelIntegratedFramebuffer kexts, which are NOT used in the 311 because it's on Ion not GMA950 and so this option is irrelevant for the 311).
- When you choose an option, the app will ask for you to authenticate (ask you to input your password) and it will mount the EFI partition so you can access it. While it is mounted, aside from adding or removing kexts, you can also do changes in other EFI elements like the com.apple.Boot.plist, smbios.plist, dsdt.aml, themes.

Perfect MacBook Air : WiFi

This could become deprecated once I Leopardize (install Mac OS X 10.5 Leopard) my HP Mini 311 because its stock WiFi card works in Leopard and not in Snow. But while I'm still on Snow Leo; this is one of the changes that make my new netbook a perfect MacBook Air for me.

Since the HP Mini 100TU's WiFi card worked flawlessly in Snow Leopard (when the said Mini was still well and alive - I think I fried it when I stupidly let it run all night to do some torrent downloading), I decided to test drive it on my new favorite, the Mini 311. The 1000's card, a Broadcom4312HMG, wasn't a combo WLAN/BT so I transferred the 311' stock combo card,a  Broadcom4312HMGB in the extra pci slot so I still have bluetooth. Now this extra pci slot only has mounts for full height cards so I used tape to secure the module. See pic below:
Note though that I've already *flashed my unit with the hacked bios F.04 that unblocks or "de-whitelists" the 311's half-height pci slot- because I originally planned to get another Snow Leo compatible WLAN/Bluetooth combo card.


What You Need
  1. Download hacked F14 HP Mini 311 BIOS courtesy of icelord.
  2. HP USB Disk Storage Format Tool SP27213.exe
  3. USB flashdrive - preferrably 2 GB or less (you may experience issues with higher capacities such as 4GB or more)
What To Do - This set of instructions are based from the "hpmini311" google code page. Proceed at your own risk. 
  1. Unzip 3651F14hack.zip. You'll get a folder named "3651F14" inside of which you see a "3651F140.fd" file. Rename this file to "3651.BIN"
  2. Use HP USB Disk Storage Format Tool to format your USB flashdrive to FAT16 or FAT32 and copy "3651.BIN" onto the USB flashdrive.
  3. Plug in your USB flashdrive contating "3651.BIN" file to your Mini 311
  4. Disconnect power supply and remove the battery.
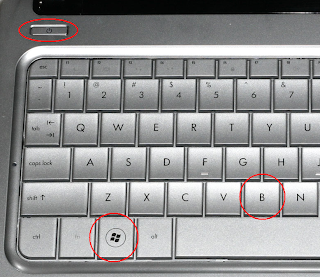
  5. Press and hold simultaneously the "Windows" (the one with the Windows logo on it) and "B" keys.
  6. Still pressing on the Win and B keys (do not let go), connect the power supply and press the Power button.
  7. Count 5 seconds before releasing Wind and B keys. You'll hear beeps and the fan will whir up to faster (if not fastest) speed than usual. DO NOT shutdown your Mini 311 and make sure electricity supply is constant. The machine will shut itself down automatically. I repeat, your HP Mini 311 will turn off on its own when the BIOS flashing process is done. Patience is a virtue or you'll brick your precious 11.6" nVidia ION netbook you paid equally precious dough for.

    And since it's already de-whitelisted (and the Mini 1000 is busted) I decided to rebrand the WiFi card with Apple vendor and product ID's so Mac OS X will see it as AirPort Extreme.

    For what practical ends might you ask?

    Update: Personally, I now think that rebranding should only be done when you experience performance issues with your 3rd party Mac OS X Snow Leo compatible WiFi cards. Among which, wireless N ones are almost definitely subject to performance issues because of the reason stated below. Other cards, b/g, in my experience are not subject to this discrimination by OS X so I don't particularly recommend you to sweat it out if all you want is a functioning b/g WiFi card. If you've O.C.D like me however, or if you're willing to take on the adventure, then by all means rebrand away! - at your own risk of course :D

    Well, Mac OS X is a pretty snobbish operating system or it's actually Apple who designed it to be that way. Aside from closing its support only to specific models and brands of hardware devices it also discriminates between vendor and product ID's. If it's non Apple branded or certified as reflected in it being labelled as "Third-Party Wireless" in System Profier, Mac OS X uses another set of instructions to drive that piece of hardware but there may be limitations. If it's Apple certified/branded, it loads full set of instructions to get the most functionality possible and ergo richest user experience. What OS X uses to identify which is which turns out to be the vendor and product ID's in the device's sprom.
    See chrand's post regarding this about wireless N and connection speeds at insanelymac.

    In my current setup, I didn't have to get antenna extensions since the working WiFi card is placed in the half-height pci slot. The wireless button doesn't work and remains orange - I can't use it to turn of bluetooth which is comes from the stock wifi/bt combo card that has been transferred to the extra full-height pci slot.

    Also the Dell 1510 (which is a Broadcom432B) will work brilliantly and can be rebranded the same way. You can use these ID's: SUBV:106b / SUBP:008d.

    Oh, well so much for being "perfect" huh? ;)

    I'm excited to install Leopard - which is up next on my to-do list for the HP Mini 311. I've already tried Leopard via EFI Vanilla but the machine just reboots all the time. A fellow forumer, mosslack, has pointed out that this is common phenomenon with the EFI booting method but that NetbookBootMaker/NetbooInstaller approach worked fine in his experience.

    EDIT : I installed an Apple AirPort Broadcom 4328 wireless N card.

    O Hardware, Hardware, Wherefore Art Thou...

    ...Hardware? Deny thy clockspeed and refuse thy UUID; or if thou will not, be but sworn my love and I will no longer be a (good) hackintosh.

    LeMaurien19: (because Hardware is not properly recognized, hence cannot say his line) Shall I hear more, or shall tweak (EFI kexts) at this?

    Your hackintosh can camouflage as any Mac model - a MacBook, MacPro3,3, MacBook Air etc. One way to get that done is edit your smbios.plist's keys and strings and put it in /Extra for Chameleon to read and load as it boots OS X. But it's not perfect - I for one, cannot rectify my system's UUID via smbios edit; I've had to add a UUID.kext containing my AirPort Extreme card's MAC address (actually just a rebranded Broadcom card that came from the guts of my deceased Mini 1000, bless its silicon soul) to get my UUID reported properly in Snow Leopard as per "genuine Mac practices".

    And then there's SMBIOSResolver.kext. In fact, I'm thinking of customizing what I see in System Profiler's report about my HP Mini 311 disguising as a MacBookAir2,1 via SMBIOSResolver.kext.


    I'll update this post for the results.

    04 January 2010

    Transfer GMail Contacts to Address Book


    Before, I used to Google high and low for a solution that will let me transfer all e-mail addresses that I've corresponded with using my Google Mail account into Address Book for use with Mail. There were apps here there free and none free; techniques in Address Book dealing with syncing it with GMail.

    None worked - okay, that's an exaggeration - some worked. Syncing Address Book with GMail (now that we've got Snow Leopard 10.6) is a myth or maybe I was just being too dumb to follow along the how-to - I'd rather tinker with my EFI partition and probe the innards of my now dead HP Mini 1000 than attempt followint that Sync Address Book with GMail stuff again.

    But this method works and it's so simple it might've been conceived for the mentally challenged mob (like me ;)):

    (1) Launch your fave web browser, I did this in Safari 4, and log into your Gmail account. Supposing we live under a rock and this it our first encounter with the concept of "electronic mail", here's the address.
    (2) On the right sidebar, along with your "inbox" and folders list, click on "Contacts"


    (3) A new box will appear; on the far upper left corner, click on "Export":


    (4) Choose which contacts you want to import; there's handy drop-down menu you can choose an option from. And select the third option for the export format - "vCard format". Click on the "Export" button at the bottom.

    The contacts will be downloaded as a "contacts.vcf" file and Address Book will automatically launch (it did for me) and ask you to confirm import of contacts contained in the file.

    That's it. In less than a minute, depending on the number of contacts you have and net connection speed, you've imported your GMail contacts into Address Book ready for browsing next time you use Mail to write an email. :D

    03 January 2010

    The Crucial Memory Advisory


    If there's anything I never could get the hang of it's memory modules nomenclature. "PC-667", "1066 MHz", "DDR", "DDR2", "DDR3". . .etc.

    After getting the HP Mini 311 on a 12-month-0%-installment-plan, I actually still have the nerve to contemplate on upgrading its memory. As if the 2048 MB the netbook came with out of the box isn't enough for facebook and all other "heavy" computing tasks that I do (shall I point out I'm using sarcasm right there, or am I being too much like Sheldon already?), my dream is maxing it out to 3072 MB.

    The goal therefore is to find the perfect 2 GB stick to swap with the 1 GB stick already in the expansion slot so that if add in the on-board 1 GB, bingo : 3 GB of ram goodness!

    So I look at HP's specs sheet for the Mini 311 and note that I should be hunting for a "DDR3 1066 SDRAM" module. A quick Google and a visit to local store's online site spit out stuff like this: PC3-8500, CL=7 1066 MHz and so on and so forth. Seeing those other bits of information, my instincts prompted me to question:
    "Wait! So that means there can be other DDR3 1066 MHz but with a different PCx-xxx, CL=x configuration?" (Nosebleed?)
    Given that I technically still do not own my netbook, I'd want it to last at least until I get to pay it in full and not kill it with faulty RAM module selection two weeks after I brought it home from the mall. I have to be careful I get the correct module. The HP Mini 311's Service Manual didn't offer much help in confirming the indicated specs of my target DDR3 module and I was pretty much stumped. Good thing there's Crucial's site which lists compatible memory for your gadget - just search for your model's brand model or make and voilà! Instant education on memory naming convention!

    (Almost) Perfect Mini MacBook Air

    Please disregard this post/guide.
    This guide is available for download in .pdf format.
    One night, after another day in the office, you decide to check out the gadget expo in the nearby mall. And though you haven't envisioned yourself buying anything (cause hey, you're there just to unwind some), you still find yourself carrying a black box that's quite heavier than when you last got your Mini 1000. That shiny new Red master card? Swiped. Despite and in spite of your resolutions to be a more sensible consumer (or perhaps to quit being a consumer at all since belonging to that demographics has proven to take a very considerable amount of toll on your financial well-being), you still have that smug look in your face, unable to hide a smile: you've just been made the proud owner of snazzy Ion equipped netbook rig in the form of the HP Mini 311. Then after playing with Windows 7 it came installed with, you're at a lost what to do with the machine cause it's the third in your growing netbook family (five actually - the first two EeePC's gone off to better hands to care for them) and you just don't need another to be honest - you just want it. 

    Well good news, cause as it turns out, the HP Mini 311 makes for one perfect MacBook Air substitute - almost. (Apple fanboys and fangirls, please, for the love of humanity, I'm not contesting the fact that is the superiority of the Mac - real Macs rock the whole universe and beyond). And the procedure is literally a no brainer.


    i. What You Need
    (1) *Download the CD Booter iso image and the Snow Leo 10.6.2 Combo Updater - Burn the iso image onto a blank CD-R (in Windows or Mac or Linux - be sure to use lowest burning speed as precautionary method to avoid a failed write and adding to your growing collection of funky over-sized coasters)

    * New "HF4" release courtesy of the HP Mini 311 Darwin Project at insanelymac.
    ** You can also use this alternative method if you don't want to burn the ISO.


    (2) External DVD drive - the LightScribe drive enclosed in a HP logo bedecked black case (that's equally chic as the Mini 311 itself, let's admit) will do the job just fine.
    (3) Snow Leopard Retail DVD - though I'm not sure if the 10.6.2 default ones are already out in the market in shrink-wrapped boxes, I can only attest to this method working on the first batch of Snow DVD's i.e. "10.6" cause that's what I have.
    (4) HP Mini 311 - the results described in this step by step installation documentation are based on the HP Mini 311-1002TU model. Tech specs of which can be found here.

    A. Install Snow Leopard
    (1) Boot up with the project CD - Put in the CD Booter that you've just burned a while ago into the external DVD drive. With the DVD drive plugged into one of the Mini 311's USB ports, power up the machine and press F9 to bring up the boot selection screen. Use the arrow keys to highlight the DVD drive and press Enter.It will take a while for Chameleon to completely load - around 2 minutes - be patient.

    **Or if you chose to go with the alternative method (without burning .iso to CD), just plug in the usb, when you press F9, choose that USB to boot from. 


    (2) Boot into the Snow Leopard Retail Install DVD - Manually eject the CD Booter from the DVD drive and put in its place the Snow Leo DVD. Wait for the drive to load the contents - 10 seconds or so would do - and then press F5 to refresh Chameleon's boot selection listed in a row. A new entry named "Mac OS X Install DVD" will be added; use arrow keys to highlight it and press Enter to boot into the installer.
    **Again, if you chose to go with the alternative method, just plug in the DVD drive and load the Snow Leo DVD. Press F5 to refresh list and then choose the Mac OS X Install DVD; press Enter.


    I'm referring to a "row" since I didn't bother wiping out the stock Win 7 partitions which my 311 came with out of the box; the Mac OS X Install DVD entry was added at the far right of the row. Also, the image above shows my list of volumes as they are now - when Mac OS X Snow Leo is already installed in my 311 (the FAT32 drive is supposedly for Win XP) 

    (3) Install Snow Leopard as you normally would - Format the Mini 311's drive first as GPT "GUID Partition Table" (Menubar > Utilities > Disk Utility), leaving standard Mac OS Extended (Journaled) as default. I suggest naming the new volume "Macintosh HD" like in real Macs.


    GPT because Snow Leopard by default installs only onto hard drives partitioned using that table. MBR could be used but that's via a custom modded installer which we won't be covering here. Besides, we're going Vanilla so we need that 200 MB hidden EFI partition that's created under GPT. The method used in this guide doesn't work on MBR.

    B. First Boot and EFI (Boot Loader/Environment) Setup

    (1) As in the first step when you installed Snow Leopard - "A.(1)" of this guide; boot with the project CD or CD Booter, as I've come to call it. (Restart the Mini 311 and press Esc, swap the Snow Leo Install DVD with the CD Booter and hit Ctrl+Alt+Del) This time choose "Macintosh HD" as the volume you want to boot. Or whatever it is you've named your installation volume.

    (2) After watching the welcome video (no sound at this point, by the way), go through Setup Assistant and configure your user account. As usual, choose "Do not transfer my files" option and "My computer doesn't connect to the internet" to get to the desktop faster. All that, we'll deal with later.

    (3) Once in your Desktop, if you haven't unplugged the DVD drive, you'll see an "HPM311 Darwin Project" disc mounted. Go inside this disc and run the "HPM311 Darwin Project.pkg" installer.


    (4) Install updates and support files - (a) go to System Preferences > Security to uncheck "Use secure virtual memory" option and run the MacOSX10.6.2ComboUpdate.

    It's done, congratulations! You've perfect Mini MacBook Air in your hands - well almost perfect Mini MacBook Air because: (1) the default smbios.plist that gets installed makes your HP Mini 311 a "MacBook6,1" ergo not a MacBook Air of course; (2) it always boots up with -v flag or "verbose mode" or else you can't resume properly from sleep; (3) the Broadcom 4312 WiFi card doesn't work; and - I could be the target for death threats for noob stupidity for this - (4) there are some more tweaks - I dare not call them "improvements" else I be shot dead right this instant or this blog attacked - that can be done regarding some kexts and EFI.

    Up next is how I think you get can get a perfect Mini MacBook Air - perfect, that is, according to my quite shallow nooby instincts. It's up to you if you wanna go with me. ;)

    01 January 2010

    HP Mini 311 Review

    This is probably the first true blue netbook review to be ever posted on My MacBook Mini. True, I've written tons about all the other netbooks I owned (five up to this day: EeePC 701, EeePC 900, MSI Wind U100, HP Mini 1001TU, HP Mini 311), it would be the HP Mini 311 that I'd attempt creating decent review for - à la LaptopMag? Not really. But it does come with a hackintosh twist for sure.

    So my beloved HP Mini 311 has won netbook of the year at LaptopMag, I wonder how it would fare as a "hackintosh netbook". :D


    Specs Sheeet:
    Intel Atom N280 1.66 MHz
    2 GB DDR3 SDRAM (Max up to 3 GB)
    nVidia Ion LE
    250 GB SATA Hard Drive (5400 RPM)
    11.6" Wide Screen glossy LCD (1366 x 768)
    Here is the HP Mini 311-1002TU's Product Specifications direct from HP's site.


    The following comes from a conversation with a friend who was asking about the 311 (he's thinking of getting one as well and is also a hackintosher hence the prevailing consideration of Snow Leopard compatibility)
    First Impressions
    The  Mini 311... is a rather good machine. I don't feel like it's a netbook - more like an ultraportable, a laptop even. When I got back home and picked up again my 1000, I was surprised at how light it was, being used to using only the 311 for an entire week. Build quality is decent. I'm loving the feel of the upper deck of the chassis which seems to be metal-like or treated with some metal finish. The screen is amazing - that's from the point of view of someone who's fed up dealing with a 1024x600 screen for hours on end.
    Input Devices
    The keyboard is the same as in the older 1000's - except for the different finish which is the same as the upper chassis deck. The trackpad is another story though, it's mediocre but usable it performs in OS X as good or as bad as it did in Windows 7.
    It was already a pity that HP didn't equip the Mini 311 with a multi-touch capable pad but it's more deplorable that they've decided to skip Synaptics. The Alps GlidePoint does not only not have proper support in Mac OS X - it's recognized as a PS2 Mouse not a real trackpad - but it's also a pain the arse to use. It's surface is sensitive in ways you don't expect it to be; that is its tap-to-click functionality feels very awkward (I still can't get hang of it - sometimes it clicks sometimes not) but I also find my cursor jumping to lines where it shouldn't cause the pad picks up input when the base of palms accidentally brush on it. Before, I was questioning if the 1000 really needed an On/Off switch for the trackpad because I thought it was unnecessary since the pad was almost microscopic. Now I'm seriously asking "where is the trackpad switch on this HP Mini 311????!!!??" to save my sanity.

    nVidia Ion LE
    People have actually figured out how to unleash the full functionality of the graphics chipset in the Mini 311. But then that's for Windows cause the whole premise relies on installing hacked drivers so the OS sees the chip as full Ion - not LE.
    I'm not sure what the exact situation on hackintoshes is but all I know is that importing a video clip in iMovie takes noticeably faster than it did on my IntelGMA950 equipped Mini 1001TU running Snow Leopard. Though I've a hunch the faster DDR3 memory also has a contribution to the over all smooth experience.

    OS X Comptability (Snow Leopard 10.6.2)
    . . .you'd be amazed at how compatible it is - even the internal mic is working! Installation has never been easy and that's owing to the great work done by the HP Mini 311 Darwin Project team at InsanelyMac. You just go over the thread page, download the CD .iso which you use with a Snow Leo retail DVD for installation and which also contains the .pkg that you run after installation. The installer conveniently sets up EFI in the internal hard drive and you're good to go - Quartz Extreme, bluetooth (good thing it's a Broadcom, it's classified by System Profiler under Macintosh portable category of device), webcam, toggle keys for brightness and volume (needless to say, audio works - via dsdt assertion so it's seen as built-in). The speakers are Altec Lansing which offers really good base and is better than in any netbooks I've owned or had my hands on.
    I got my unit with stock 2 GB ram and right now, it's sleeping fine. They've even done a good job with getting the high-speed USB devices right in the dsdt cause I don't get that horrid "Device Removal Error message" when I put the machine to sleep and a drive is left plugged into the usb port.
    What does not work in Mac OS X Snow Leopard 
    Battery life is a terrible 2 hours maximum. It does last longer - 4.5 hrs average - in Windows 7 and even longer in Windows XP, well, allegedly - 5-6 hrs.
    WiFi - it's the same (almost) dead end case as in the Mini 110. I tried extracting its firmware via Linux using the b43-fwcutter tool and it just won't let me do that - the card is recognized as Broadcom 4312 802.11 b/g card all right but when I try to pry its firmware it causes the machine to freeze. Even my trusty all-hack-purpose MSI Wind can't stand that card. So I'm currently using my 1000's WiFi card on my 311, the 311's stock card which is a WiFi+BT combo card, I transferred to the extra full-height pci slot so I still have BT.

    How to manually flash your BIOS with icelord's hacked one

    CAUTION: The following instructions below are to be carried out AT YOUR OWN RISK. I am not responsible for any damage resulting from this.

    UPDATE: My HP Mini 311 is a 311-1002TU to be exact. It uses a 1MB BIOS rom file and this is what this guide refers to. Should yours require the 2MB BIOS rom file, then use the 2MB file included in the .zip file.

    What You Need:
    1. USB flash drive - the HP Mini 311, some say, is picky with USB's. Use one that you've tested to work before - in the previous BIOS updates, F.15 and below.
    2. Icelord's F.16 - This bios image has a customized logo, a happy Mac, by MowgliBook. Unzip the package and rename either the 1MB or 2MB file 3651.BIN. Depending on your HP Mini 311 model - Google is your best friend in finding out which file your Mini 311 uses.

    Prepare the USB to be used as BIOS flasher:
    1. Format the USB drive to FAT32 - I normally do this in Windows, just to be sure using the HP USB Disk Storage Format Tool.
    2. Put 3651.BIN, the one you downloaded above, to the USB drive.

    Flash the BIOS:
    1. Turn off the HP Mini 311 and remove the battery. Make sure you plug its AC adapter to electricity source.
    2. Plug in the USB BIOS flasher - I prefer using the USB port at the left, along side the AC adapter/power port.
    3. Press "Windows" and "B" keys at the same time. Hold for around 15 seconds.
    4. Without letting go of "Windows" and "B" keys, press the Power button to turn on the machine. Wait for about 15 seconds.                                           
    5. Let go of the two keys simultaneously. In the next 10 - 30 seconds or so, your HP Mini 311 will beep and its fan will run. DO NOT TURN IT OFF or do anything, let it do its own thing and IT WILL TURN OFF ON ITS OWN.
    6. Plug in the battery back and plug out the USB BIOS flasher. Verify that you do have F.15 bios by pressing F10 before the computer loads the OS.

    Addendum: If your USB flashdrive, formatted as FAT32 via Windows default formatting feature, try formatting it with the HP USB Disk Storage Format Tool linked above. If it sill doesn't work despite following the flashing guide closely, then it might be that your USB flashdrive is unfortunately of the kind that is not compatible with the HP Mini 311 (see comment at #1 in "What You Need" section). Use another USB.