Showing posts with label dual boot os x win 7. Show all posts

08 August 2010

Living with Snow Leopard + Windows 7 Dual-boot on my Mini MacBook 311

I've posted a new guide and yep, it's a dual-boot guide. Yipee, err, "youpi" I should say cause I'm supposed to be French - a fake "française" rather.

It's been around 2 weeks since I've re-set up my HP Mini 311 to get Windows 7 professional shoved in alongside Snow Leopard. The decision to let Windows 7 occupy the "first" OS volume was not easy for my inner Apple fangirl but for lack of other solution to make Chameleon see an NTFS formatted volume, I hardly gave my consent.

And in the span of 2 weeks, my detestation for the partition scheme mentioned above has been slowly waning down to the point of normalcy. I still sometimes find myself wince as I see Disk Utility list "Win7" volume over "Macintosh HD". But I'm continually learning just to breathe in calmly and click on that red X button at the top left corner of app's window.

But the annoyance does not stop there, I'm afraid, for I also have to deal with bluetooth becoming unavailable, never to be roused again from the land of the dead so it seemed, after booting into the dark, err, Windows 7 side. Further investigation has revealed that Windows 7 didn't particularly like the fact that there are actually 2 WiFi cards installed. But the blame, I do not entirely put on Windows 7 because HP has some doing with it itself: PCI slot/bus management.

If you've been reading this blog for quite a while, you know that I've transferred the HP Mini 311's stock WiFi + BT combo card to the full height slot and installed the BCM94312HM(anything not exactly reflecting this Broadcom model won't work on the 311, so don't try to hi-jack this post with comments asking that, consider yourself informed in advance) on the half-height slot. This I was able to do because I'm using icelord's dewhitelisting F.15 bios.

Well, it seems that the stock WiFi + BT combo card has a super hard time thriving in the full-height slot under Windows. I tried to run the driver provided by HP but it won't install properly. The fact that Windows 7 will always attempt to install the device drivers it has for the card wreaks further havoc, resulting to one catastrophe that particularly ticks me: the stock WiFi + BT combo on the full-height slot gets shut down somehow and when I log into OS X, it shows as "Bluetooth: Not Available":
And no amount of coaxing, in the form of combined efforts of pressing the wireless button and restarting the machine, would resolve the problem in OS X. Plus it's no better on the Windows 7 side as the appropriate driver wouldn't even install.

What I Did To Restore Bluetooth on OS X side:
1. While booted in Windows 7, I went to Computer > System Properties > Device Manager > Network Adapters.
2. Uninstalled Broadcom 802.11g Network Adapter. In my case, as the WiFi card I'm using under Snow Leopard is also a Broadcom, I have Broadcom 802.11g Network Adapter #2. So I need to verify that this is indeed the correct card I want to have uninstalled by checking its Device ID via Properties:
3. Uninstall all other devices showing in the Device Manager tree that's related to Bluetooth. Also uninstall Coprocessor under Other Devices:
4. We've just uninstalled some device drivers that were automatically installed by Windows 7. At this point, Windows 7 has automatically installed drivers for the additional WiFi card that I intend to use both in Win 7 and OS X. Thus, I can now stop Windows 7 from auto-installing drivers from now on. I do that by launching gpedit.msc. Just click on the Win Orb, equivalent of "Start" and type "gpedit.msc" (without the quotes of course) in the run box and press Enter.
5. In gpedit.msc, go to Computer Configuration > Administrative Templates > System > Device Installation > Device Installation Restrictions. At the right side panel, right click on "Prevent installation of devices not described by other policy" > Edit
6. This brings up a new window. Click on the radio button "Enabled" and click on "Apply".
7. Restart the computer and boot again into Windows 7 for the changes to be implemented and to verify that Windows no longer automatically installs device drivers.
8. Restart again and boot this time to OS X and verify that Bluetooth is now available once more. Should Bluetooth be still unavailable even though you've verified that Windows 7 no longer automatically installs device drivers, try to shutdown the machine completely and then turn it on again and boot into OS X. Bluetooth should become available.

NOTE: This means that you don't have Bluetooth in Windows 7. I chose to go with this option as I'm pretty happy with OS X, doing all of my computing in there, and Windows 7 still has WiFi connection. 

To be honest, I'm still waiting for that scintillating moment, that most opportune incident that will make me thank the heavens above for setting up this dual-boot configuration. Will that day come before my inner Apple fangirl prevails and push me to purge my Mini MacBook pure, devoid of anything Windows again?

07 August 2010

Windows 7 & Snow Leopard (10.6.4) on the HP Mini 311


Today is UPCAT day as well as tomorrow, so even Saturday classes (my 2 MA classes included) had a holiday. I've time to post a dual-boot guide.
Before You Begin.
For best results/hackintosh experience. Update to HP Mini 311 BIOS - F.15.
You can install the stock HP F.15 BIOS which can be installed in Windows or icelord's de-whitelisted version (which unlocks the PCI slots) by manually flashing the machine.


Installation Method 1 - DVD/Optical media method

What You Need:
  1. BootCD.iso - burn this onto a blank CD-R. I recommend using the slowest setting to ensure no write errors occur.
  2. Snow Leoaprd Mac OS X Retail DVD - 10.6 base up to latest, 10.6.4 currently, should work fine. DO NOT use the restore DVD's that are shipped with real Macs (won't work) but get instead the store-bought shrink-wrapped copy from your local Apple Store or Apple Reseller.
  3. Current Project Release - HPM311DP HF6 Installer as we speak.
  4. External USB DVD drive - there HP Mini 311 models with sales packages including a Light Scribe external DVD writer drive.
  5. Mac OS X 10.6.4 Combo Update
  6. Windows 7 DVD Installer.

What To Do:
  1. With the DVD drive connected to the Mini 311 (with enough battery of course or plugged directly to an power outlet), load the BootCD-altPS2 disc you've just burned. As you power on the Mini 311, press F9.
  2. You will see a boot menu list. Use the arrow keys to choose your DVD drive and press Enter to boot from it.
  3. When Chameleon has loaded, you'll see list of icons representing drives in your system to boot from. Manually eject the DVD drive and replace BootCD-altPS2 with the Snow Leo Mac OS X Retail DVD. Wait until the drive fully loads the new DVD you've inserted as indicated by the drive's led light and/or until you hear it's finished loading the new DVD (some light mechanical sound and then drive becomes quiet).
  4. Press F5 to refresh the Chameleon boot menu. Normally, the "Mac OS X Install DVD" entry is added at the far right of the horizontal row of drives available. Use arrow keys to select "Mac OS X Install DVD" and press Enter key.
  5. Once you've selected the language, go to Utilities Disk Utility > Partition. Create 2 partitions - the 1st partition for Windows, the 2nd for Mac OS X. For now, you can format both of the drives as "GUID Partition Table" and "HFS Journaled (Extended)". I also suggest you name the resulting volume "Macintosh HD", just like in real Macs. 
  6. Proceed with installation of Mac OS X on the 2nd partition. You will get an error message that the "Installation Failed". This is perfectly normal; OS X only told you that cause it's detected that the hard drive is not bootable which is something we'll deal with later.
  7. Use the same BootCD-altPS2 disc to boot up Mac OS X on your HP Mini 311 for the first time. Just choose the "Macintosh HD" drive icon in the Chameleon boot menu.
  8. Configure your User Account and Install the Mac OS X 10.6.4 Combo Updater. Restart.
  9. Boot up the Mini 311 with the Windows 7 DVD. After choosing the language and clicking  "Next", once you get to the "Where do you want to install Windows?" dialog box, format the partition you allotted to Windows 7 (partition 2) since EFI is your partition 1. If you want the partitions to be absolutely clean - as in no "Unallocated Space" between partitions 1 and 3 or between Win 7 and Snow Leo - you can opt to delete partition 2 then create a new one in replacement. Windows 7 will create 2 partitions (100 MB system reserved and main Win 7) but we don't want that. So delete the main Win 7 partition and choose "Extend" option to, well, extend the 100 MB System Reserved partition to the now "Unallocated Space". Proceed with installing Windows 7.
  10. The HP Mini 311 will restart and you'll notice that the default OS that it boots up is Windows 7. Just boot into Windows 7 to configure your User Account and login to your Desktop for the 1st time.
  11. Boot into Mac OS X. You do this using the BootCD-altPS2.iso and choosing "Macintosh HD". Once you're inside the Desktop, install the HPM311DP HF6 Installer.pkg. Installing HF6RC4 will configure and make OS X the default OS for the HP Mini 311.
  12. Boot the Mini 311 again using the Windows 7 DVD installer and press Shift + F10 to bring up the Command line. Activate the Windows 7 partition (partition 2) using diskpart, press "Enter" after each line:
    1. diskpart
    2. select disk 0
    3. select partition 2
    4. active
    5. exit
  13. Once back in the main Windows 7 installer dialog screen, choose "Repair Computer" option. Follow the on screen guide to repair boot for Windows 7. Restart the Mini 311.
  14. Once again, boot with the Windows 7 DVD installer and press Shift + F10 again. This time, we will activate EFI partition (partition 1):
    1. diskpart
    2. select disk 0
    3. select partition 1
    4. active
    5. exit
  15. Quit the Windows 7 installer and restart the HP Mini 311. As the the machine starts up, press and hold F8 key. This will bring up the Chameleon boot menu. You should be able to see 2 bootable volumes: "Untitled" (NTFS) and "Macintosh HD" (HFS).
Congratulations on your Mini MacBook 311 Snow Leopard & Windows 7 dual-boot!

Other Little Tweaks.
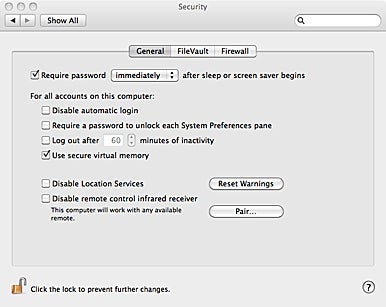
Disable "Use secure virtual memory". In Mac OS X, go to System Preferences > Security General tab > uncheck "Use secure virtual memory". It would require restarting for the change to be fully applied. We do this to help ensure Sleep function has no problems on our hackintosh.
image from macworld.com

Replace stock WiFi with a Snow Leopard compatible card - For what is a netbook without wireless connectivity, right? Unfortunately, the HP Mini 311's stock wireless module does NOT work under Snow Leopard. Hit the links below for further details:

- Prevent Windows 7 from installing drivers for the stock WiFi + BT combo card. I recommend using the additional WiFi card in Windows 7 for connecting to the internet instead of the stock WiFi + BT combo card. Caution: this will disable Bluetooth under Windows but it will be functional in Mac OS X. Click here for the How-To-Guide.

27 July 2010

Finally Gave In

And LeMaurien19 is dual-booting 10.6.4 Mac OS X Snow Leopard and Windows 7 Professional on her HP Mini MacBook Pro 311.
image from zedomax.com
Not without some difficulties to hurdle first before things are finally settled on both sides. Good thing I didn't have to reinstall Snow Leopard from scratch and go through the trouble of updating everything. 

First, I had Carbon Copy Cloner back up my then current up to date 10.6.4 system to a .dmg file. 
Then booted off from a 10.6 Snow Leo installation on an external USB hard drive (used MultiBootISO with BootCD-altPS2.iso inside). 
Used Disk Utility to reformat and repartition my HP Mini 311's hard drive as GUID (GPT)
- 32 GB disk0s2 - for Windows 7
- 200 GB disk0s3 - for Mac OS X.
Used Carbon Copy Cloner again to restore the 10.6.4 .dmg back-up I created earlier onto the HP Mini 311's hard drive.
Installed Windows 7 - this entailed formatting the disk0s2 or partition 2 (EFI is partition 1 in the Windows world). For my part, being the obsessive compulsive me, I just had to make sure there weren't any nasty "unallocated space" between my Windows 7 and Mac OS X 10.6.4 partitions.
With Windows 7 installed and my default OS from then on, I restarted to boot into Mac OS X and installed HF6RC4.pkg.
Restarted the 311 to boot into Windows 7 installer and activated partition 3 using diskpart. Continued with "Repair Computer" option.
Restarted again to boot (again) into the Windows 7 installer and activated partition 1 EFI using diskpart.
VoilĂ . Chameleon now sees my Win 7 volume and boot into it.
My dual boot system is done!

Lesson: Chameleon is NOT able to see an NTFS formatted volume if it is not in disk0s2 or partition 2.

If anyone has found a way to force Windows 7 to install to a FAT32 volume (Chameleon recognizes disk0s3 if it is FAT32 or Mac OS X Journaled, just NOT NTFS), please speak up and enlighten us all :D

I'll update this post with pics and hopefully, update the HP Mini 311 Snow Leopard Installation Guide as well.